 Python 학습하기👆

티스토리 뷰
다양한 디바이스 화면을 지원하기 위해서는 반응형 디자인이 필수입니다.
오늘은 그중 하나인 반응형 버튼에 대해서 알아보려고 합니다.
보통 버튼을 만들면 고정 사이즈로 만들게 되고 이는 다양한 디바이스의 화면을 지원하지 못하는 문제가 있습니다.
예전에는 프로젝트별 지원 디바이스 종류가 많지 않아 문제가 되지 않았지만... 시간은 흘러 이제는 사이즈를 고려할 때가 온 것 같습니다.
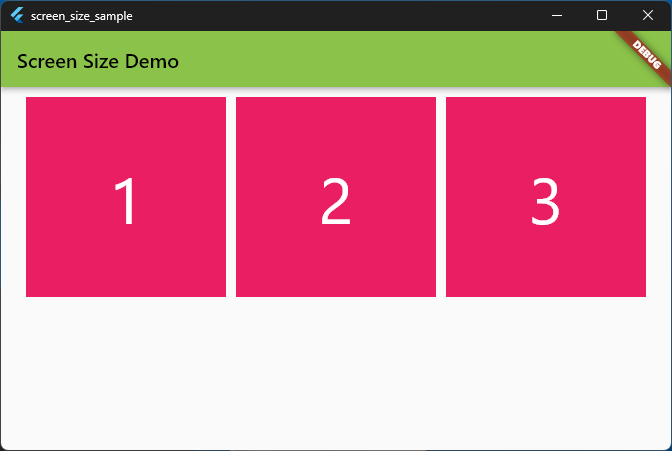
아래와 같이 화면사이즈가 버튼사이즈보다 큰 경우는 문제가 없지만,
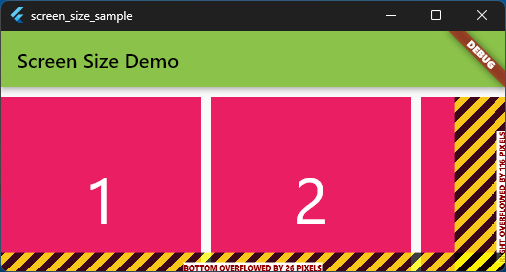
반대로 화면사이즈가 버튼사이즈보다 작아질 경우 버튼 이미지가 잘리게 됩니다.(문제 발생)
이러한 문제를 해결하기 위해서는 실시간 화면 사이즈에 맞게 버튼 사이즈도 변경이 되어야 합니다.
( 반응형 기본 개념 : 화면(전체) 사이즈를 얻어서 버튼(특정 객체) 사이즈에 적용 )
Flutter에서는 MediaQuery 객체를 이용해서 화면 사이즈를 얻을 수 있습니다.
1. 아래와 같이 화면 사이즈 기준으로 특정 객체의 사이즈를 얻는다.
// 화면 width 얻기
_screenWidth = MediaQuery.of(context).size.width;
// 버튼 width 지정 (필요에 맞게 지정)
_buttonWidth = (_screenWidth - (_spaceWidth * 4)) / 3;
// 화면 height 얻기
_screenHeight = MediaQuery.of(context).size.height;
// 버튼 height 지정 (필요에 맞게 지정)
_buttonHeight = (_screenHeight - (_spaceHeight * 4)) / 3;
// 폰트 사이즈 지정
if (_buttonWidth < _buttonHeight) {
  _fontSize = _buttonWidth / 2;
}
else {
  _fontSize = _buttonHeight / 2;
}
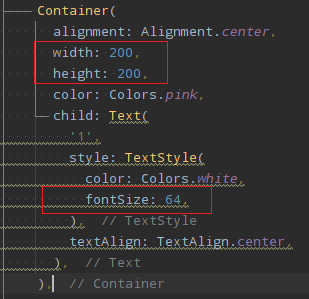
2. 그리고 위에서 얻어온 특정 객체 사이즈를 특정객체에 적용해준다.
Container(
  alignment: Alignment.center,
  // width 지정
  width: _buttonWidth,
  // height 지정
  height: _buttonHeight,
  color: Colors.pink,
  child: Text(
    '1',
    style: TextStyle(
      color: Colors.white,
      // 폰트 사이즈 지정
      fontSize: _fontSize,
    ),
    textAlign: TextAlign.center,
  ),
),
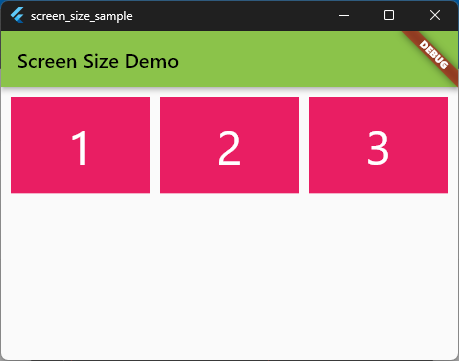
3. 그러면 아래와 같이 화면 사이즈가 버튼 사이즈보다 작아지면 버튼 사이즈도 함께 작아져서 문제가 되지 않습니다.
아래 전체 소스 및 실행 화면 공유합니다.
지금은 한 번 실행해 보는 센스가 중요할 때입니다. 남은 하루도 파이팅!!!입니다.
< main.dart >
import 'package:flutter/material.dart';

void main()
{
  runApp(const SampleApp());
}

class SampleApp extends StatelessWidget {
  const SampleApp({Key? key}) : super(key: key);

  @override
  Widget build(BuildContext context) {
    return MaterialApp(
      title: 'Screen Size Sample App',
      theme: ThemeData(
        primarySwatch: Colors.lightGreen,
      ),
      home: MainScreen(),
    );
  }
} // end of SampleApp

class MainScreen extends StatefulWidget {
  const MainScreen({Key? key}) : super(key: key);

  @override
  State<MainScreen> createState() => _MainScreenState();
}

class _MainScreenState extends State<MainScreen> {

  final double _spaceWidth = 10.0;
  final double _spaceHeight = 10.0;
  double _screenWidth = 0.0;
  double _screenHeight = 0.0;

  double _buttonWidth = 0.0;
  double _buttonHeight = 0.0;
  double _fontSize = 0.0;

  @override
  Widget build(BuildContext context) {
    _screenWidth = MediaQuery.of(context).size.width;
    _buttonWidth = (_screenWidth - (_spaceWidth * 4)) / 3;
    _screenHeight = MediaQuery.of(context).size.height;
    _buttonHeight = (_screenHeight - (_spaceHeight * 4)) / 3;
    if (_buttonWidth < _buttonHeight) {
      _fontSize = _buttonWidth / 2;
    }
    else {
      _fontSize = _buttonHeight / 2;
    }

    return Scaffold(
      appBar: AppBar(
        title: const Text('Screen Size Demo'),
      ),
      body: Center(
        child: Column(
          children: <Widget>[
            SizedBox(width: 0.0, height: _spaceWidth),
            _showFirstLineButton(),
          ],
        ),
      ),
    );
  }

  Widget _showFirstLineButton() {
    return Center(
      child: Row(
        mainAxisAlignment: MainAxisAlignment.center,
        children: [
          Container(
            alignment: Alignment.center,
            width: _buttonWidth,
            height: _buttonHeight,
            color: Colors.pink,
            child: Text(
              '1',
              style: TextStyle(
                color: Colors.white,
                fontSize: _fontSize,
              ),
              textAlign: TextAlign.center,
            ),
          ),
          SizedBox(width: _spaceWidth, height: 0.0),
          Container(
            alignment: Alignment.center,
            width: _buttonWidth,
            height: _buttonHeight,
            color: Colors.pink,
            child: Text(
              '2',
              style: TextStyle(
                color: Colors.white,
                fontSize: _fontSize,
              ),
              textAlign: TextAlign.center,
            ),
          ),
          SizedBox(width: _spaceWidth, height: 0.0),
          Container(
            alignment: Alignment.center,
            width: _buttonWidth,
            height: _buttonHeight,
            color: Colors.pink,
            child: Text(
              '3',
              style: TextStyle(
                color: Colors.white,
                fontSize: _fontSize,
              ),
              textAlign: TextAlign.center,
            ),
          ),
        ],
      ),
    );
  } // end of _showFirstLineButton
}
'개발 > Flutter' 카테고리의 다른 글
| Flutter : InkWell 버튼 만들기 (0) | 2023.05.02 |
|---|---|
| Flutter : 즐겨 찾기 (2) | 2023.04.26 |
| Flutter : AnimatedBuilder widget (0) | 2023.04.14 |
| Flutter : AnimatedAlign widget (1) | 2023.03.22 |
| Flutter : 개발팁 정리 (1) | 2023.02.28 |